Old Fashioned Water Bath Pickles
- Time: 30 min active + 24 hrs cooling
- Flavor/Texture Hook: Sharp, tangy, and snap crisp
- Perfect for: Pantry stocking and beginner canners
Making Easy Water Bath Pickles
There is something about the smell of simmering vinegar and fresh dill that feels like a trip back to my grandmother's kitchen. For generations, canning was the only way to make the summer harvest last through the winter.
I remember watching her line up pint jars on the counter, the air thick with the scent of garlic and brine. It wasn't just about the food, it was a ritual that signaled the change of seasons.
Most people feel intimidated by canning, but once you get the rhythm down, it's actually quite relaxing. The clinking of the jars in the pot and the satisfying "pop" of a sealing lid are the best parts. You aren't just making a snack, you're building a little library of flavor in your pantry.
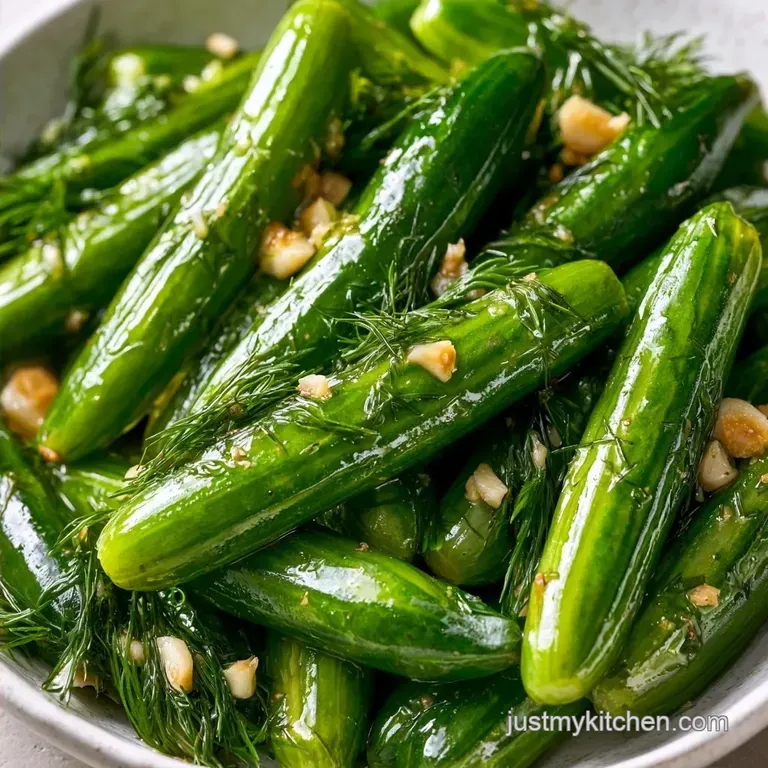
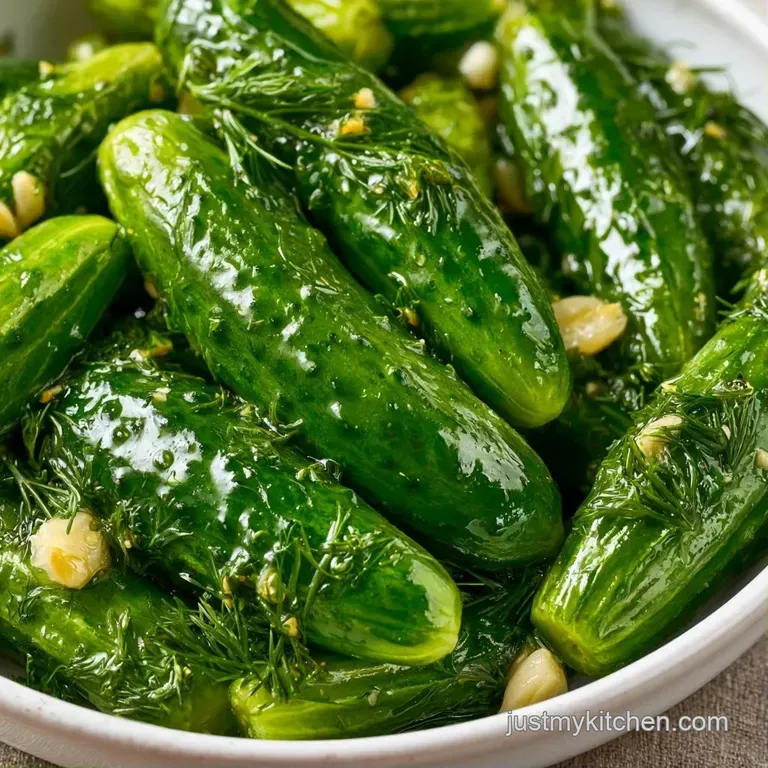
These Water Bath Pickles provide that classic, sharp snap we all crave. Whether you're serving them at a family BBQ or eating them straight from the jar at midnight, they bring a bright, acidic punch to any meal.
Why the Brine Works
- Vinegar Acidity: The 5% acidity in the distilled white vinegar lowers the pH level of the cucumbers. This creates an environment where harmful bacteria can't grow.
- Pickle Crisp: Adding calcium chloride prevents the pectin in the cucumber cell walls from breaking down. This is what gives you that audible snap.
- Heat Processing: Boiling the jars for 10 minutes kills any remaining microorganisms and forces air out of the jar to create a vacuum.
| Method | Shelf Life | Texture | Best For |
|---|---|---|---|
| Quick Fridge | 3-4 Weeks | Very Crunchy | Immediate eating |
| Water Bath | 12 Months | Firm & Snap | Long term storage |
| Fermented | 6-12 Months | Soft/Salty | Probiotic focus |
What Each Ingredient Does
| Ingredient | What It Does | Best Swap |
|---|---|---|
| Kirby Cucumbers | Provides the firm structure | Persian cucumbers |
| Distilled Vinegar | Acidifies for safety | Apple cider vinegar |
| Pickling Salt | Firms skin without clouding | Sea salt (non iodized) |
| Fresh Dill | Adds the signature herby note | Dill seed |
The Unspoken Truths
Canning Pickles for Beginners often feels like a high stakes chemistry project, but it's really just about following a few hard rules. The biggest thing nobody mentions is the "blossom end" issue.
If you don't slice off that tiny bit of the cucumber end, the enzymes there will turn your pickles into mush, regardless of how much Pickle Crisp you use. I learned that the hard way with a whole batch of soggy spears a few years ago.
Another thing to keep in mind is the temperature shock. If you put cold jars into boiling water, they can crack. I always keep my jars in a simmering pot of water before I fill them. It's a small step that saves a lot of wasted brine and a messy stove.
Using an Old Fashioned Hot Water Bath Pickles approach means being patient with the cooling process. Do not touch those jars for 24 hours. Every time you move them, you risk breaking the seal before it has fully set.
The anticipation is the hardest part, but the reward is a pantry full of Homemade Canned Pickles.
Quick Recipe Specs
- 1. The Slice
- Remove exactly 1/16th of an inch from the blossom end.
- 2. The Gap
- Leave exactly 1/2 inch of headspace at the top of the jar.
- 3. The Timer
- Process in the water bath for exactly 10 minutes.
- Prep Flow (30 min)
- Wash, slice, and prep jars.
- Cooking Flow (25 min)
- Boil brine, fill jars, and process.
- Finish (24 hrs)
- Cool undisturbed and check seals.
Essential Ingredient List
- 4 lbs Kirby or pickling cucumbers, sliced into spears Why this? They have thicker skins and stay firmer
- 6 cloves garlic, peeled and smashed
- 6 sprigs fresh dill
- 6 tsp Pickle Crisp Why this? Essential for a professional grade crunch
- 4 cups distilled white vinegar (5% acidity)
- 4 cups filtered water
- 1/2 cup pickling salt Why this? No iodine, which prevents cloudy brine
- 1 tbsp granulated sugar
- 1 tbsp whole black peppercorns
- 1 tsp mustard seeds
- 1 tsp red pepper flakes
Required Tools
You don't need a professional kitchen, but a few specific tools make this much easier. A wide mouth stainless steel pot is a must for your water bath. Avoid aluminum pots, as the vinegar can react with the metal and give your Water Bath Pickles a metallic taste.
I highly recommend a bubble remover tool. It's a thin plastic spatula that helps you get rid of air pockets. If you don't have one, a plastic chopstick or a butter knife works in a pinch. You also need a jar lifter to pull the hot jars out of the boiling water safely.
Step by step Method
- Wash and scrub cucumbers thoroughly. Slice 1/16th of an inch off the blossom end of each cucumber to remove enzymes that cause softening.
- Cut cucumbers into spears or rounds.
- Keep canning jars in simmering water to sterilize and prevent cracking when filled with hot brine.
- Place smashed garlic, dill, peppercorns, and mustard seeds at the bottom of each sterilized jar.
- Add 1 tsp of Pickle Crisp to each jar.
- Pack the cucumber spears vertically into the jars, leaving approximately 1/2 inch of headspace at the top.
- In a stainless steel pot, combine distilled white vinegar, filtered water, pickling salt, and sugar. Bring to a boil.
- Carefully pour the hot brine over the cucumbers in each jar, maintaining the 1/2 inch headspace.
- Use a bubble remover tool to eliminate trapped air from the jars.
- Wipe the jar rims clean, apply new canning lids and bands, tightening them until finger tip tight.
- Process the jars in a water bath canner for 10 minutes until the timer dings and the water is at a rolling boil.
- Remove jars and allow them to cool undisturbed for 24 hours to ensure a vacuum seal.
Fixing Common Issues
If you see bubbles moving in your jars after they've cooled, you might have a seal failure. This usually happens because the rim of the jar wasn't wiped clean. A single grain of salt or a drip of brine can prevent the lid from gripping the glass.
Another common issue is cloudy brine. This almost always comes from using table salt instead of pickling salt. The anti caking agents in table salt make the liquid look milky. It's still safe to eat, but it doesn't look as nice on the shelf.
Preventing Mushy Pickles
The most common complaint with Water Bath Pickles is a lack of crunch. This happens if the cucumbers were too warm when they hit the brine or if the blossom ends weren't removed.
| Problem | Root Cause | Solution |
|---|---|---|
| Soft Texture | Blossom end left on | Slice 1/16" off the end |
| Cloudy Brine | Used iodized salt | Use pure pickling salt |
| Lid didn't seal | Dirty jar rim | Wipe rim with vinegar/cloth |
Simple Flavor Swaps
If you want a different vibe, you can easily tweak the spice mix. For a sweeter version, increase the sugar to 1/4 cup and add some sliced onions. If you prefer a fiery kick, double the red pepper flakes or add a sliced habanero to each jar.
Since these are such a versatile condiment, they pair great with other home cooked sides. For example, these sharp pickles are the perfect acidic balance to a Classic Macaroni Salad recipe.
Quick Decision Guide: If you want it spicier, add sliced jalapeños. If you want it sweeter, add cinnamon sticks and more sugar. If you want it more herby, add fresh oregano or thyme.
Keeping Your Jars Safe
The real secret is getting the pH right. When you're dealing with preserved foods, particularly those stored at room temperature, the acidity is what keeps things safe. According to data on Clostridium botulinum, a pH below 4.6 is necessary to prevent the growth of dangerous toxins. That's why using 5% acidity vinegar is non negotiable.
I like to do a "big batch" session in November. It's a great way to transition into the winter months. While my jars are cooling, I usually start prepping other seasonal treats, like a batch of Homemade Eggnog for the holidays.
Store your sealed jars in a cool, dark place like a pantry or basement. Direct sunlight can fade the color of the pickles and degrade the flavor over time. Once you open a jar, keep it in the fridge and eat it within a month.
Serving Your Batch
When you're ready to serve, don't just dump them in a bowl. I like to slice the spears into coins for burgers or keep them whole for a charcuterie board. The brine is actually gold, so don't toss it. I use leftover pickle brine to marinate chicken or as a base for a tangy salad dressing.
For a nice presentation, serve them in a chilled glass bowl with a few fresh sprigs of dill on top. The contrast of the bright green cucumbers against a white bowl always looks fresh.
Debunking Pickling Myths
Some people believe you need a specialized pressure canner for all vegetables. That's not true for high acid foods. Because of the vinegar, Water Bath Pickles are perfectly safe to process in boiling water.
Another myth is that you must use "pickling cucumbers" only. While Kirby cucumbers are the best for crunch, you can use almost any firm cucumber. Just avoid the long, seed heavy English cucumbers, as they tend to get soft very quickly in the heat.
Storage and Zero Waste
Keep your jars in the pantry for up to a year. For the best quality, eat them within 6 months. If you notice any bulging lids or a foul smell upon opening, toss them immediately.
To reduce waste, use the cucumber scraps from your slicing. You can toss the ends into a compost bin or freeze them to make a quick, rough chopped relish for hot dogs. If you have extra brine, it's a great way to salt brine a piece of fish or add a zing to a homemade potato salad.
High in Sodium
816 mg 816 mg of sodium per serving (35% 35% of daily value)
The American Heart Association recommends a daily sodium limit of 2,300 mg to help manage blood pressure and reduce the risk of heart disease.
Tips to Reduce Sodium
-
Reduce Pickling Salt-25%
The pickling salt is the primary sodium source; try reducing the amount by 25% to significantly lower the sodium content while maintaining the brine structure.
-
Use Salt Substitutes-20%
Replace a portion of the salt with a potassium based salt substitute to maintain the savory profile with less sodium.
-
Add Acidic Brightness-10%
Incorporate lemon zest or a splash of lemon juice to provide a sharp, acidic 'bite' that mimics the taste of salt.
-
Enhance Fresh Aromatics
Increase the amount of fresh dill and smashed garlic to provide more depth and flavor without adding any extra sodium.
Recipe FAQs
How long do you put pickles in a hot water bath?
Process them for 10 minutes. Ensure the jars are fully submerged in boiling water to create a proper vacuum seal.
How long will water bath pickles last?
Store them in the pantry for up to a year. For the best quality and crispness, try to consume them within 6 months.
Do homemade dill pickles in vinegar need to be refrigerated?
No, they are shelf stable once processed. If the jars are sealed correctly via the water bath, they can stay in the pantry until you open them.
How to make pickle relish from the leftovers?
Freeze the cucumber scraps from slicing. Once frozen, roughly chop them to create a quick, homemade relish for hot dogs.
How to make homemade pickles with white vinegar?
Boil distilled white vinegar, filtered water, pickling salt, and sugar. Pour this hot brine over packed cucumbers and process the jars in a water bath.
Is it true you can leave the blossom end of the cucumber on?
No, this is a common misconception. Slice 1/16th of an inch off the blossom end to remove enzymes that cause the pickles to soften.
Why did my pickles turn out soft?
Failure to remove the blossom end or omitting Pickle Crisp usually causes this. If you enjoyed mastering this texture control here, see how we manage moisture in our flaky crust recipe.
Water Bath Pickles

