The Best Chewy Peanut Butter Cookies: Soft and Fudgy
- Time:15 minutes active + 10 minutes baking = Total 25 minutes
- Flavor/Texture Hook: Velvety smooth center with a slight golden snap on the edges
- Perfect for: Last minute bake sales or late night cravings
Imagine that heavy, toasted aroma of roasting peanuts filling every corner of your kitchen, mixed with the sweet, caramel like scent of melting brown sugar. It's that specific smell that tells you your house has officially become a bakery for the afternoon.
I remember making these for a neighborhood potluck a few years back, and I didn't even have time to plate them properly before they were gone.
The magic is in how they feel when you bite into them. They aren't those dry, crumbly disks that leave you searching for a glass of water. Instead, they have a soft, almost fudgy give that makes them feel like a treat from a high end pastry shop, but they're actually made in one bowl.
Whether you're baking for a rainy afternoon or just need a comfort snack, this method delivers. I've tweaked the sugar and fat ratios over time to make sure you get the best chewy peanut butter cookies every single time you fire up the oven.
Trust me, once you try this specific balance, you'll never go back to the store-bought dough.
The best chewy peanut butter cookies
The secret to that specific "chew" isn't just the peanut butter, but how we handle the sugars. Most people just throw in white sugar, but that leads to a crispier, flatter cookie. By leaning heavily on dark brown sugar, we introduce molasses, which holds onto moisture and creates a denser, more velvety texture.
I once tried to make these using only natural, stir style peanut butter. The result? A puddle on my baking sheet. For this specific result, stabilized peanut butter (the kind that doesn't separate) is your best friend because it contains a tiny bit of palm oil or stabilizer that keeps the cookie from collapsing.
If you love a soft texture, you might also enjoy my Sourdough Discard Cookies recipe, which uses a similar approach to moisture retention. But for pure, nutty bliss, this is the one.
Why this texture works
The balance of fat and moisture is a delicate dance. Here is what's happening behind the scenes to ensure your cookies stay soft.
The Sugar Ratio: Brown sugar is hygroscopic, meaning it attracts water. This keeps the center moist and creates that signature chewy pull.
Stabilized Fat: Using stabilized peanut butter prevents the oil from leaking out during the bake, which keeps the cookie thick.
The Under Bake: Pulling the cookies while the center looks matte and soft prevents them from drying out. They finish cooking on the hot pan.
Egg Emulsion: Beating the egg into the butter sugar paste creates a structure that traps air, giving the cookies a tender crumb.
| Feature | Freshly Baked From Scratch | store-bought Shortcut | Impact |
|---|---|---|---|
| Texture | Velvety and soft | Often grainy or hard | Huge |
| Flavor | Deep toasted peanut | Artificial peanut scent | High |
| Control | Adjustable sweetness | Fixed, usually too sweet | Medium |
Component Analysis
Understanding your ingredients helps you troubleshoot on the fly. Here is why we use these specific items.
| Ingredient | Science Role | Pro Secret |
|---|---|---|
| Dark Brown Sugar | Moisture & Flavor | Provides the chew and caramel notes |
| Stabilized PB | Structure & Fat | Prevents "puddling" on the tray |
| Baking Soda | Leavening | Reacts with brown sugar for a soft lift |
| Unsalted Butter | Tenderness | Allows us to control the salt level |
Ingredients
For the best results, make sure your egg and butter are truly at room temperature. This ensures they emulsify properly without breaking the batter.
- 1 cup Creamy Peanut Butter (Stabilized) (250g) Why this? Keeps cookies thick and prevents spreading
- 3/4 cup Dark Brown Sugar (Packed) (150g) Why this? Adds moisture and deep molasses flavor
- 1/4 cup Granulated White Sugar (50g) Why this? Gives the edges a slight golden crisp
- 1/2 cup Unsalted Butter (Softened) (115g) Why this? Creates a tender, velvety crumb
- 1 large Egg (Room Temperature) Why this? Binds ingredients and adds structure
- 1 tsp Vanilla Extract (5ml) Why this? Rounds out the nuttiness with warmth
- 1 cup All Purpose Flour (125g) Why this? Provides the essential gluten structure
- 1/2 tsp Baking Soda (3g) Why this? Creates a soft, chewy rise
- 1/4 tsp Salt (1.5g) Why this? Enhances the peanut flavor
Ingredient Swaps
Sometimes the pantry is bare, or you have dietary needs. Here is how to pivot without ruining the batch.
| Original Ingredient | Substitute | Why It Works |
|---|---|---|
| Creamy PB (1 cup) | Almond Butter (1 cup) | Similar fat content. Note: Slightly milder flavor and softer set |
| Dark Brown Sugar | Light Brown Sugar | Still works for chew. Note: Less caramel flavor, lighter color |
| All Purpose Flour | Oat Flour (1 cup) | Nutty taste. Note: Texture becomes denser and more crumbly |
| Unsalted Butter | Coconut Oil (solid) | Similar fat. Note: Adds a slight coconut hint and more spread |
I usually stick to the originals for the best chewy peanut butter cookies, but the almond butter swap is a total winner if you're avoiding peanuts.
Key Steps
Let's get into the process. The key here is not to overmix once the flour goes in. If you overwork the dough, you'll end up with a tough cookie instead of a tender one.
Phase 1: Creaming the Base
- Beat the softened butter, brown sugar, and white sugar together on medium high speed. Mix until the mixture is pale, fluffy, and resembles a thick paste. Note: This incorporates air for a lighter texture.
- Beat in the egg and vanilla extract. Continue mixing until fully emulsified and the mixture looks like a smooth, creamy frosting.
Phase 2: Integrating the Nut Butter and Dry Ingredients
- Fold in the creamy peanut butter. Use a spatula or mixer on low until the mixture is smooth and uniform.
- In a separate small bowl, whisk together the all purpose flour, baking soda, and salt. Note: Whisking removes flour clumps.
- Slowly stir the dry ingredients into the wet ingredients. Mix only until the white streaks of flour disappear.
Phase 3: Shaping and Baking
- Scoop rounded tablespoons of dough. Roll them into 1 inch balls using your palms.
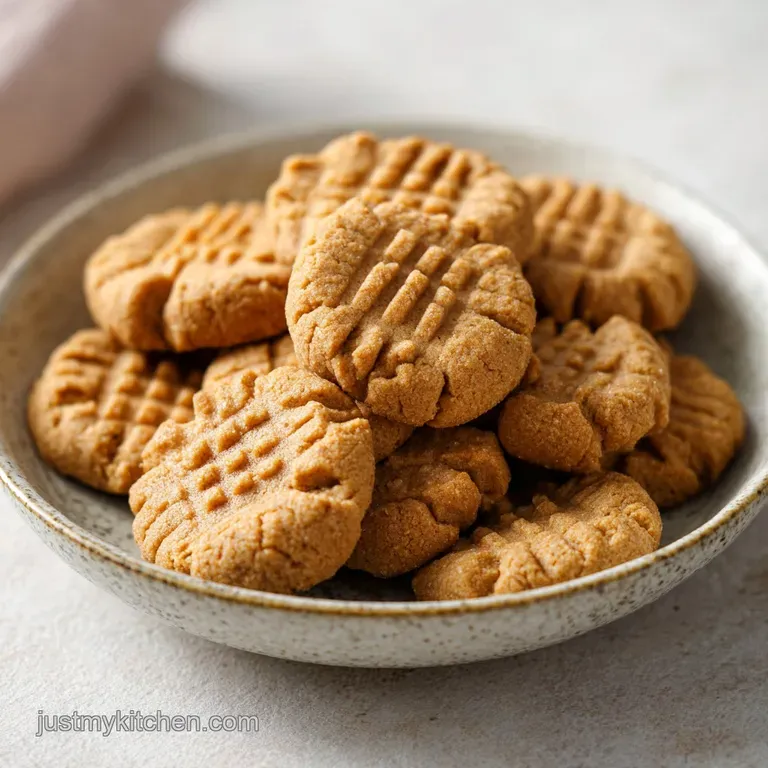
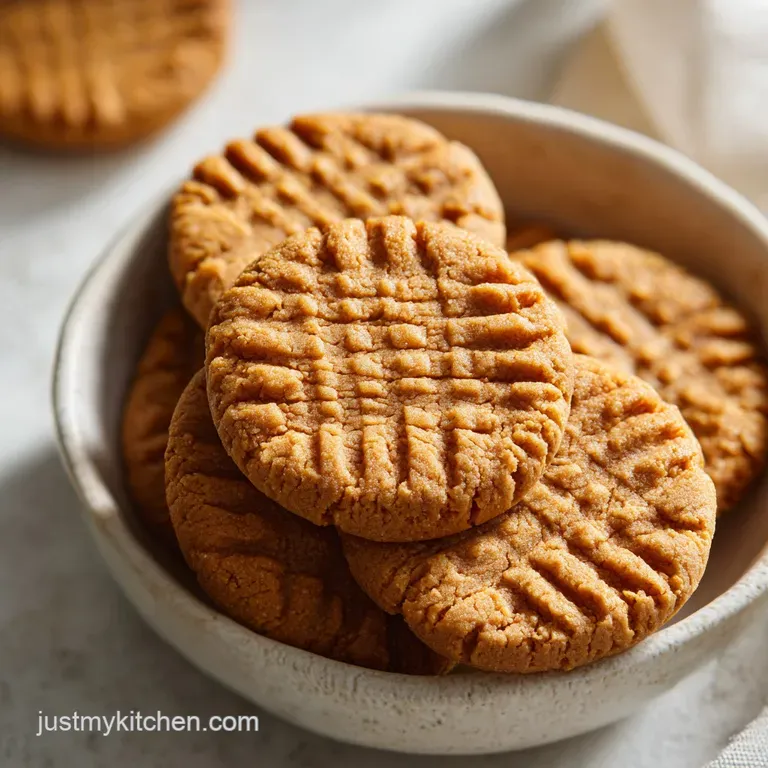
- Place balls on a lined baking sheet. Press down with a fork in a criss cross motion.
- Bake at 350°F (175°C) for 8-10 minutes. Remove when edges are golden tan but centers still look slightly soft and matte.
Chef's Tip: If you want a deeper flavor, try browning your butter in a pan first and letting it solidify back to a soft state. It adds a toasted, nutty note that pairs magically with the peanut butter.
What Can Go Wrong
Even the best of us have a bad batch. Usually, it comes down to temperature or measurement.
The Cookies Spread Too Much
This usually happens if your butter was too melted or if you used natural peanut butter that separates. The fat breaks down the structure too quickly in the oven.
The Dough is Too Crumbly
If the dough won't hold a ball shape, you might have over measured the flour. Flour is easy to pack too tightly into a measuring cup, which adds more than the recipe intends.
The Centers Stay Raw
If the edges are burnt but the middle is raw, your oven might be running too hot. Check your rack position and ensure you're using a light colored baking sheet.
| Problem | Root Cause | Solution |
|---|---|---|
| Flat cookies | Butter too soft/warm | Chill dough for 30 mins before baking |
| Dry texture | Overbaked/Too much flour | Pull from oven 1 min earlier |
| No rise | Old baking soda | Test soda with vinegar to ensure it bubbles |
Common Mistakes Checklist
- ✓ Did you use stabilized peanut butter instead of natural?
- ✓ Is your butter softened but not melted?
- ✓ Did you stop mixing as soon as the flour disappeared?
- ✓ Are you pulling them out while the centers still look soft?
- ✓ Did you use a room temperature egg to prevent the batter from splitting?
Creative Twists and Swaps
Once you've mastered the base, you can start playing with the flavors. This recipe is like a blank canvas for peanut lovers.
For a Chocolatey Kick
Press a few mini chocolate chips into the top of the dough balls before pressing them with the fork. The combination of melted chocolate and peanut butter is a classic for a reason. If you love variety, check out my Homemade M&M Cookies for another colorful option.
For a Salty Sweet Contrast
Sprinkle a pinch of flaky sea salt (like Maldon) on top immediately after they come out of the oven. The salt cuts through the richness of the peanut butter and makes the flavors pop.
For Extra Texture
Add 1/4 cup of chopped roasted peanuts to the batter in the final step. This adds a satisfying crunch that contrasts with the velvety center.
Decision Shortcut
- If you want a fudgy center → Bake for exactly 8 minutes.
- If you want a crispier edge → Bake for 11 minutes.
- If you want a thicker cookie → Chill the dough for 1 hour before baking.
Adjusting Batch Sizes
Whether you're baking for a crowd or just yourself, you can scale this recipe easily.
Scaling Down (1/2 batch) Use 1/2 cup peanut butter, 6 tbsp butter, and 1/2 cup flour. For the egg, crack one into a bowl, beat it, and use half. Reduce baking time by about 1-2 minutes since there's less mass in the oven.
Scaling Up (2x batch) Double everything except the salt and baking soda; increase those by only 1.5x to avoid a metallic taste. Work in batches rather than crowding one huge tray, as this affects air circulation and can lead to uneven baking.
Baking Tips for Large Batches If you're baking multiple sheets, lower the oven temperature to 325°F (160°C) and extend the time by 2-3 minutes. This prevents the bottom cookies from burning while the top ones finish.
Debunking Cookie Myths
There are a lot of "rules" in baking that aren't actually rules. Let's clear some up.
Myth: You must chill peanut butter dough. While chilling helps with spread, this specific recipe uses stabilized peanut butter and a high brown sugar ratio, meaning you can bake them immediately and still get a thick cookie. Chilling is optional here.
Myth: Natural peanut butter is always better for baking. In a salad, yes. In a cookie, no. Natural peanut butter has a higher oil to solid ratio that often causes these cookies to melt into a single giant pancake. Stabilized is the way to go for structure.
Myth: Searing the butter is only for fancy cakes. Actually, browning butter for cookies is a secret weapon. It removes water and toasts the milk solids, giving your cookies a deeper, more professional flavor profile.
Storage Guidelines
To keep that velvety texture, you need to protect the cookies from the air.
Fridge and Counter Store these in an airtight container at room temperature for up to 5 days. If you live in a very humid area, keep them in the fridge to prevent them from getting too soft, but let them come to room temperature before eating.
Freezing for Later These freeze beautifully. You can freeze baked cookies for up to 3 months, or freeze the raw dough balls. If freezing the dough, just add 2 minutes to the baking time.
Zero Waste Tips If you have a tiny bit of peanut butter left in the jar that you can't scoop out, pour your melted butter or vanilla into the jar and shake it up. It’s a great way to get every last bit of flavor into your batter without wasting a drop.
Serving Suggestions
While these are great on their own, a few additions can turn them into a real dessert event.
Pair these with a cold glass of whole milk or a hot cup of coffee. The bitterness of the coffee balances the sweetness of the brown sugar perfectly. For a fancy presentation, serve them on a platter with a drizzle of melted dark chocolate and a few fresh raspberries.
If you're serving these at a party, stack them in a pyramid with a bowl of whipped cream on the side. For those who like a little more "oomph," a small dollop of apricot jam on top of a warm cookie creates a sophisticated, fruity contrast that's surprisingly addictive.
Recipe FAQs
Can I use natural peanut butter instead of stabilized?
No, use stabilized peanut butter. Natural varieties often cause cookies to spread too much or become overly greasy during baking.
How to prevent the cookies from becoming hard?
Remove them when edges are golden tan but centers look soft and matte. Bake at 350°F for 8 10 minutes to ensure they retain their chewy texture.
Is it true that I should bake the cookies until the centers are fully browned?
No, this is a common misconception. The cookies continue to set on the hot baking sheet; pulling them early prevents them from drying out.
How to store the cookies for maximum freshness?
Place them in an airtight container at room temperature. They remain velvety for up to 5 days, though fridge storage is recommended in humid climates.
Can I freeze the raw dough balls?
Yes, they freeze beautifully. Simply add 2 minutes to the baking time when cooking them directly from the freezer.
How to create the traditional fork marks?
Press down on the 1 inch balls with a fork in a criss cross motion. Perform this step immediately after placing the dough on the lined baking sheet.
Why did my cookies spread too much?
Ensure your butter is softened rather than melted. If you mastered the stable emulsion of butter and sugar here, see how the same principle works in our garlic lemon butter sauce.
Chewy Peanut Butter Cookies

