Healthy Homemade Glutenfree Flourless Oat Bread
- Time: Active 20 minutes, Passive 50 minutes, Total 1 hours 10 mins
- Flavor/Texture Hook: Hearty, nutty crumb with a subtle honey toasted crust
- Perfect for: High fiber breakfast toast or post workout fuel
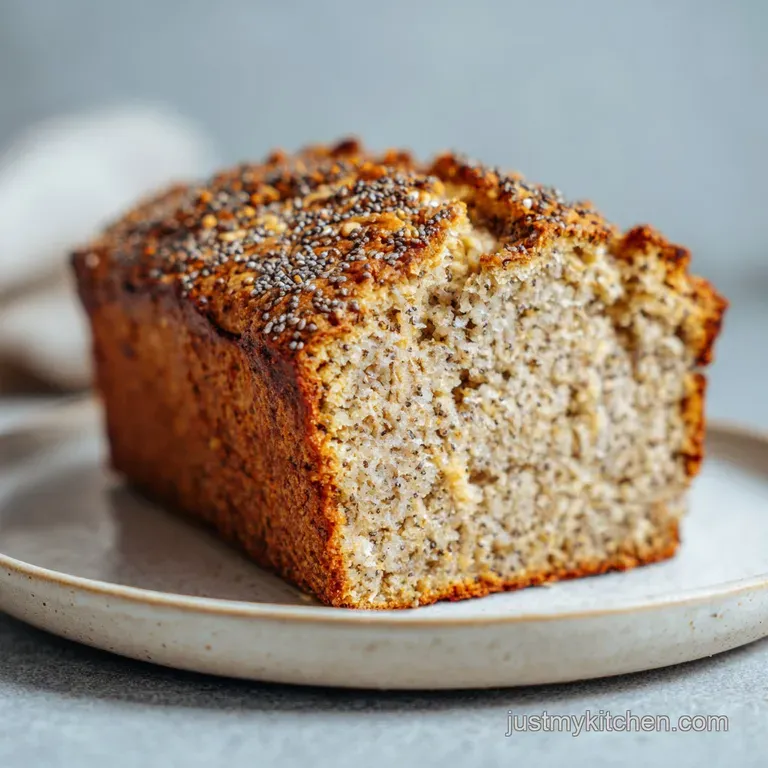
- Healthy Homemade GlutenFree Flourless Oat and Chia Bread with Honey
- The Physics of the Chia Seed Bond
- Understanding the Nutritious Elements of Your Components
- The Essential Elements and Smart Substitutes
- Minimalist Tools for an Efficient Baking Process
- Step By Step Transformation to a Golden Loaf
- Solving Common Texture and Moisture Issues
- Scaling the Recipe for Large Batches
- Effective Storage and Food Waste Reduction
- Healthy Pairings and Debunking Baking Myths
- Recipe FAQs
- 📝 Recipe Card
Healthy Homemade GlutenFree Flourless Oat and Chia Bread with Honey
The first time I pulled this loaf out of the oven, the aroma was a total revelation. It wasn't that yeasty, airy scent of a standard baguette, but rather a deep, toasted warmth that reminded me of golden granola cooling on a sheet pan.
I stood in my kitchen, knife in hand, waiting with that restless impatience we all feel when something smells this good. When I finally cut into it, the crust gave a soft shatter, revealing a crumb that was impossibly moist without being gummy.
It was the solution to every failed, crumbly gluten-free experiment I'd ever suffered through.
Bake this healthy homemade gluten-free flourless oat and chia bread with honey for a deliciously simple treat. For those of us who prioritize nutrition but refuse to eat cardboard, this recipe is a massive win.
We're skipping the expensive, processed flour blends and focusing on whole, nutrient dense ingredients that actually do something for your body. No fancy stand mixers, no proofing boxes just simple tools and a bit of patience while the oats and seeds do their heavy lifting.
You can expect a loaf that feels heavy and substantial in your hand, much like a dense European rye. It doesn't flop over when you load it with avocado or almond butter. Instead, it holds its own, offering a velvety interior contrasted by those tiny, crunchy chia seeds that pop ever so slightly with every bite.
It’s practical, it’s high protein, and it’s become the backbone of my weekly meal prep.
The Physics of the Chia Seed Bond
Hydrophilic Mucilage: When chia seeds meet warm water, they create a gelatinous coating that acts as a natural binder, replacing the structural role usually held by gluten.
Starch Hydration: Rolled oats absorb moisture slowly, which prevents the bread from becoming a soggy mess while ensuring the center remains tender for days.
Maillard Caramelization: The raw honey reacts with the heat and oat proteins to create a deep golden exterior that offers a complex, toasted flavor profile.
| Method | Time | Texture | Best For |
|---|---|---|---|
| Standard Oven | 50 minutes | Uniform, thick crust | Traditional sandwich slices |
| Stovetop (Cast Iron) | 15 minutes | Extra crispy edges | Quick individual "flatbread" portions |
| Toaster Oven | 40 minutes | Very dry and crunchy | Small batches or single servings |
Right then, let's talk about why we choose the oven method for the primary bake. While the stovetop is great for a quick fix, the oven’s ambient heat is what allows the core of this flourless loaf to set properly without burning the bottom.
It ensures that 350ml of water is perfectly distributed through the 300g of oats, creating that reliable, sliceable texture we’re after.
Understanding the Nutritious Elements of Your Components
| Ingredient | Science Role | Pro Secret |
|---|---|---|
| gluten-free Oats (300g) | Primary Bulk | Pulse 1/3 of the oats into a coarse meal for a tighter, less crumbly crumb. |
| Chia Seeds (80g) | Structural Binder | Use whole seeds rather than ground to maintain a pleasant, poppy texture. |
| Raw Honey (40g) | Moisture Retainer | Honey is hygroscopic, meaning it pulls moisture from the air to keep the bread soft. |
| Coconut Oil (45ml) | Lipid Barrier | Melted fat coats the oat fibers, preventing them from becoming too tough during the bake. |
The Essential Elements and Smart Substitutes
To get the best results, you need to be precise with your measurements. This isn't a "vibe based" bake; it’s a chemistry project that tastes like a dream. We are using 3 cups (300g) of gluten-free rolled oats as our foundation. Make sure they are certified gluten-free if you have a high sensitivity.
For the binding, 0.5 cup (80g) of chia seeds is non negotiable.
For the lift, we use 2 tsp (10g) of baking powder and 0.5 tsp (3g) of sea salt to sharpen the flavors. The liquid phase involves 1.5 cups (350ml) of warm water, 2 tbsp (40g) of raw honey, and 3 tbsp (45ml) of melted coconut oil. If you are looking for another nutrient dense way to start your day, you might also enjoy this Chia Seed Pudding recipe which uses similar hydration principles.
- gluten-free Rolled Oats: Quinoa flakes. Why this? Provides the essential complex carbohydrates and "flourless" bulk needed for the loaf's structure.
- Chia Seeds: Ground flaxseeds. Why this? Essential for creating the "gel" that binds the oats together without gluten.
- Raw Honey: Maple syrup. Why this? Adds a natural sweetness and helps in the browning process via caramelization.
- Coconut Oil: Melted ghee or avocado oil. Why this? Introduces healthy fats that soften the crumb and improve the overall mouthfeel.
- Warm Water: Unsweetened almond milk. Why this? Hydrates the seeds and oats to activate the natural gums and starches.
Minimalist Tools for an Efficient Baking Process
You don't need a high tech kitchen to master this. A standard 9x5 inch (23x13 cm) loaf pan is the only "big" equipment required. I prefer a silicone pan or a metal one lined with parchment paper. If you use metal without parchment, be prepared for a struggle the honey and chia can be quite clingy.
You’ll also need a large mixing bowl and a sturdy spatula. Since we aren't kneading, a simple hand mix is all it takes. A digital scale is highly recommended for weighing the 300g of oats and 80g of chia seeds, as volume measurements can vary wildly depending on how tightly you pack your measuring cups.
step-by-step Transformation to a Golden Loaf
- Preheat your oven to 180°C (350°F). Note: A stable temperature is vital for the initial set of the chia seeds.
- Mix the 300g rolled oats, 80g chia seeds, 10g baking powder, and 3g sea salt in a large bowl.
- Whisk the 350ml warm water, 40g raw honey, and 45ml melted coconut oil in a separate jug.
- Combine the wet and dry ingredients, stirring vigorously until the mixture becomes thick and heavy.
- Rest the batter for 10 minutes. Note: This allows the chia seeds to fully hydrate and "lock" the moisture in.
- Transfer the batter into your lined loaf pan, smoothing the top with a wet spatula.
- Bake for 50 minutes until the top feels firm and looks golden brown.
- Check for doneness by tapping the bottom; it should sound slightly hollow.
- Cool in the pan for 10 minutes, then move to a wire rack. Wait until completely cold before slicing. Note: Slicing too early causes the internal steam to escape, leading to a dry loaf.
Solving Common Texture and Moisture Issues
One mistake I once made was rushing the cooling process. If you cut this bread while it’s still warm, the steam is still active inside, and you'll end up with a gummy, wet center. It’s tempting, I know, but trust me on this let it sit. Another issue is using "quick oats" instead of rolled oats.
Quick oats turn into mush, whereas rolled oats maintain their shape and provide that "bread like" chew we want.
The Problem of the Crumbly Slice
If your bread is falling apart, the most likely culprit is under hydration or old chia seeds. Chia seeds lose their "gel" power over time. Ensure your water is warm (not boiling, not cold) to kickstart the absorption immediately. For another reliable bake that handles texture perfectly, check out this Moist and Grain Free recipe for a sweeter variation.
| Problem | Root Cause | Solution |
|---|---|---|
| Gummy center | Sliced while too hot | Let cool for at least 2 hours on a wire rack. |
| Crumbly edges | Oats didn't hydrate | Let the batter rest for 15 mins instead of 10 before baking. |
| Burnt bottom | Pan placed too low | Move the rack to the middle or top third of the oven. |
- ✓ Always use warm water (about 40°C) to activate the chia mucilage quickly.
- ✓ Line your pan with parchment paper, leaving an "overhang" to lift the loaf out easily.
- ✓ Pulse a small portion of the oats if you prefer a smoother, more commercial bread texture.
- ✓ Ensure your baking powder is fresh; test it in a splash of vinegar to see if it fizzes.
- ✓ Avoid "Old Fashioned" oats that are extra thick, as they require significantly more hydration time.
Scaling the Recipe for Large Batches
If you're doing a big meal prep Sunday, you can easily double this recipe. However, when doubling, do not just double the salt and spices. Use 1.5x the amount of salt and baking powder to avoid an overly metallic or salty taste. For the liquids, stick to the 2x rule, but keep a close eye on the consistency.
When baking two loaves at once, you may need to increase the bake time by about 10 minutes, as the extra mass in the oven absorbs more heat. If you're looking to make smaller portions, like muffins, you can check out this Banana Oat Muffins recipe for a similar flavor profile in a smaller format.
| Servings | Oats | Chia Seeds | Water | Bake Time |
|---|---|---|---|---|
| 6 (Half) | 150g | 40g | 175ml | 40 minutes |
| 12 (Standard) | 300g | 80g | 350ml | 50 minutes |
| 24 (Double) | 600g | 160g | 700ml | 60 minutes |
Effective Storage and Food Waste Reduction
Since this bread is highly moist, it shouldn't sit on the counter for more than two days. Store it in an airtight container in the fridge for up to 5 days. For long term storage, slice the loaf first, then freeze the slices with small pieces of parchment paper between them.
This allows you to grab a single slice and pop it straight into the toaster. It will stay fresh in the freezer for up to 3 months.
Don't toss the "heels" or any small crumbles that break off. These are gold. I like to pulse the leftovers in a blender to make "oat bread crumbs." Use them as a nutrient dense topping for yogurt or even as a binder for healthy turkey meatballs.
If the bread gets a bit stale, it makes the most incredible French toast because the dense structure absorbs the egg wash without disintegrating.
Healthy Pairings and Debunking Baking Myths
This bread is a canvas for healthy fats. My absolute favorite way to eat it is toasted until the edges are almost charred, then topped with smashed avocado, a squeeze of lemon, and a sprinkle of red pepper flakes. The honey in the dough provides a tiny hint of sweetness that balances the savory avocado perfectly.
If you're leaning into the sweet side, a thick layer of almond butter and sliced strawberries is unbeatable.
One common myth is that flourless bread is always "egg heavy" or "rubbery." This recipe proves that you don't need eggs to achieve a solid, sliceable structure. The combination of fiber from the oats and the gel from the chia seeds provides a much more natural, grain forward texture.
Another myth is that gluten-free bread must be complicated. Honestly, this is simpler than making a standard white loaf because there is no kneading and no risk of over working the dough.
Chef's Tip: For an extra velvety interior, try "soaking" your oats in the warm water and honey mixture for 30 minutes before adding the chia seeds. This softens the outer husk of the oat, making the final bread feel much more like a traditional wheat loaf.
Baking this bread is about more than just having something to put in the toaster; it's about taking control of your ingredients. We've managed to pack 4.4g of protein and nearly 5g of fiber into every single 167 calorie slice.
It’s efficient, it’s nutritious, and it’s honestly one of the most rewarding recipes in my weekly rotation. Give it a try, and you'll see exactly why I stopped buying the frozen, store-bought gluten-free loaves years ago.

Recipe FAQs
Is it good to eat chia seeds with honey?
Yes, this is a classic pairing. The honey's sugars help the chia seeds absorb moisture faster, speeding up the gel formation needed for binding. We use this principle in the initial soak.
Can you make bread with oat flour only without adding chia seeds?
No, the structure will fail. Without the hydrophilic mucilage provided by the chia seeds, oat flour alone cannot create the necessary gluten-free network to hold the loaf together upon baking.
Are honey and chia seeds good for weight loss?
They can contribute positively when consumed in moderation. Chia seeds offer high fiber, promoting satiety, while honey is a healthier, natural sweetener than refined sugar.
What is best to mix with chia seeds for weight loss?
Water or unsweetened liquid is best for pure satiety. Mixing them into liquids, like water or unsweetened almond milk, maximizes the feeling of fullness due to fiber expansion.
How do I ensure this dense loaf slices without crumbling?
Allow the bread to cool completely before slicing, ideally for two hours. The internal structure needs time to set post bake as the steam dissipates.
Is it true that I must use warm water for the chia seed activation?
No, this is a common misconception regarding speed. While cold water works, warm water (about 40°C) drastically accelerates the development of the binding gel, which is crucial for an efficient bake time.
Can I substitute the honey for another natural liquid sweetener?
Yes, maple syrup is the best one-to-one replacement. Both offer crucial hygroscopic properties that keep the crumb moist, much like how we control moisture ratios when making a fresh Green Goddess Sandwich recipe.
Flourless Oat Chia Bread

Ingredients:
Instructions:
Nutrition Facts:
| Calories | 167 kcal |
|---|---|
| Protein | 4.4g |
| Fat | 7.2g |
| Carbs | 22.5g |
| Fiber | 4.8g |
| Sugar | 2.8g |
| Sodium | 137mg |
