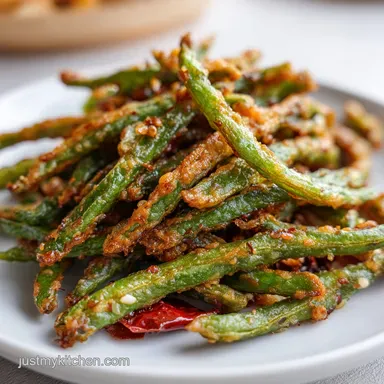
Fried Green Beans: Blistered and Savory

- Time: Active 5 minutes, Passive 10 minutes, Total 15 minutes
- Flavor/Texture Hook: Blistered, smoky skins with a savory garlic soy glaze.
- Perfect for: Quick weeknight side dishes and family dinners.
- Making the Best Ever Blistered Fried Green Beans
- Why Dry Surface Area Creates Maximum Crunch
- The Essential Pantry Items for Better Flavor
- Why You Only Need One Good Pan
- How to Get the Perfect High Heat Sizzle
- Fixing Common Texture and Flavor Mistakes Quickly
- Easy Ingredient Swaps for Special Dietary Needs
- How to Store and Reheat Your Leftovers
- Main Courses That Go With These Beans
- Recipe FAQs
- 📝 Recipe Card
Making the Best Ever Blistered Fried Green Beans
The first time I tried to make "fried" green beans, I made a massive mess. I thought I had to fill a Dutch oven with a quart of oil, batter the beans, and dodge hot splatters for half an hour. The result was a soggy, oily pile that didn't even taste like a vegetable anymore.
It was a disaster that left my kitchen smelling like a fast food joint for three days.
But then I learned about the "dry frying" method used in Chinese cooking. You don't need a gallon of oil or a heavy batter. You just need a hot pan and a little bit of patience. When the beans hit that shimmering oil, they shouldn't just sit there; they should whistle and pop.
That sound is the moisture escaping, which is exactly what allows the skins to pucker and blister into those beautiful mahogany spots we're looking for.
Forget everything you’ve heard about having to deep fry these to get them "crispy." We’re going to achieve that addictive, smoky texture using just two tablespoons of oil and a heavy skillet.
It’s faster, it’s easier, and honestly, it tastes a whole lot better because you can actually taste the bean under all that garlic and soy.
Why Dry Surface Area Creates Maximum Crunch
Surface Evaporation: High heat causes the water inside the bean skin to turn to steam instantly, which creates the "blistered" look without making the interior mushy.
Oil Conductivity: Using a neutral oil with a high smoke point allows the pan to stay hot enough to sear the skins without the oil breaking down and tasting bitter.
Aromatic Infusion: Adding the garlic at the very end prevents the tiny pieces from burning while the beans take on their color, ensuring a sweet rather than acrid flavor.
Sugar Caramalization: The tiny pinch of sugar reacts with the soy sauce to create a thin, glossy glaze that clings to the pucker marks on the beans.
| Method | Total Time | Texture Result | Cleanup Level |
|---|---|---|---|
| Our Skillet Method | 15 minutes | Tender crisp & blistered | Low (One pan) |
| Traditional Deep Fry | 35 minutes | Crunchy & oily | High (Oil disposal) |
| Oven Roasting | 25 minutes | Soft & shriveled | Low (Sheet pan) |
This comparison shows why the stovetop "fried" method is such a favorite for busy weeknights. You get the texture of a professional kitchen without the greasy cleanup. If you’re looking for other ways to master the art of the quick sear, you might enjoy learning how to make a Sweet Potato Breakfast Hash which uses a very similar pan searing technique to get those crispy edges.
| Component | Science Role | Pro Secret |
|---|---|---|
| Neutral Oil | Heat Transfer | Use Grapeseed or Avocado oil for the highest heat stability. |
| Kosher Salt | Moisture Draw | Salt helps break down the tough cellular walls of the bean slightly. |
| Soy Sauce | Umami Base | Adds deep savory notes and the liquid needed for the final glaze. |
| Sugar | Maillard Aid | A tiny amount helps the soy sauce thicken and stick to the beans. |
The Essential Pantry Items for Better Flavor
- 1 lb fresh string beans: Ends trimmed and patted completely dry. Why this? Fresh beans have the structural integrity to stand up to high heat searing.
- Substitute: Wax beans or long beans work perfectly here too.
- 2 tbsp neutral oil: Grapeseed, avocado, or peanut oil. Why this? These oils won't smoke or burn at the high temperatures we need.
- Substitute: Canola oil is a fine budget friendly alternative.
- 0.5 tsp kosher salt: For seasoning and texture. Why this? Kosher salt has larger grains that are easier to control than table salt.
- Substitute: Sea salt (use a slightly smaller amount).
- 4 cloves garlic: Finely minced. Why this? Fresh garlic provides a punchy, sharp flavor that bottled garlic lacks.
- Substitute: 1 tsp garlic powder (add it with the sauce, not the frying).
- 0.5 tsp red pepper flakes: For a hint of heat. Why this? Flakes distribute heat more evenly throughout the oil.
- Substitute: 1/2 tsp chili crisp for more depth.
- 1 tsp toasted sesame oil: For the finish. Why this? This oil is for aroma and should never be used for the actual frying.
- Substitute: Toasted sesame seeds for a bit of crunch.
- 1 tbsp soy sauce: The main seasoning liquid. Why this? It provides salt, color, and a hit of fermented savoriness.
- Substitute: Tamari or liquid aminos for a gluten-free version.
- 0.5 tsp sugar: To balance the salt. Why this? Sugar helps create that restaurant style glossy finish on the beans.
- Substitute: Honey or maple syrup.
Why You Only Need One Good Pan
You don't need a fancy arsenal of tools to make Fried Green Beans. The most important thing is a heavy bottomed skillet. A cast iron pan is my personal favorite because it holds onto heat like a champ.
When you drop a pound of cold beans into a thin, cheap pan, the temperature drops immediately, and instead of frying, your beans will just start to steam.
If you don't have cast iron, a large stainless steel skillet or a traditional carbon steel wok will work. You just want something with enough surface area so the beans aren't piled on top of each other. If they’re crowded, they’ll get mushy. You’ll also need a good pair of tongs.
I prefer the ones with silicone tips so they don't scratch the pan, but any sturdy tongs will do for tossing the beans without breaking them.
Finally,, make sure you have plenty of paper towels or a clean kitchen towel. I cannot stress this enough: the beans must be bone dry. Any water left on the beans will turn into steam, and steam is the enemy of the blister. I usually wash my beans first thing, then let them sit on a towel while I mince the garlic.
How to Get the Perfect High Heat Sizzle

- Wash the green beans and dry them thoroughly with paper towels. Note: This is the most important step for achieving a blistered texture.
- Heat 2 tablespoons of neutral oil in a large heavy bottomed skillet or wok over medium high heat until shimmering.
- Add the beans in a single layer. Note: If your pan is small, do this in two batches to avoid crowding.
- Let them sit undisturbed for 2–3 minutes until the skins develop mahogany colored blisters.
- Toss with tongs and fry for another 3–4 minutes until tender crisp.
- Reduce heat to medium.
- Push the beans to the sides of the pan and add the minced garlic and red pepper flakes to the center.
- Sauté for 60 seconds until the garlic is fragrant and pale gold but not burnt.
- Add the soy sauce, sugar, salt, and toasted sesame oil.
- Toss all ingredients together for 30 seconds until the beans are evenly glazed and glossy. Serve immediately.
Fixing Common Texture and Flavor Mistakes Quickly
One of the biggest issues people run into is the "tough bean" syndrome. This happens when the heat is too low and the beans cook for too long. They lose their moisture and turn rubbery rather than tender. If you find your beans are taking forever to color, turn that heat up!
You want to see smoke wisps not a forest fire, but enough to know the oil is ready to work.
Another common pitfall is the bitter garlic finish. Garlic has a high sugar content and burns in a heartbeat at the temperatures we use to blister the beans. That's why we push the beans to the side and drop the heat before adding the aromatics.
It gives you that sixty second window to cook the raw edge off the garlic without turning it into bitter black charcoal.
Why Your Green Beans Are Soggy
If your beans look more like they've been boiled than fried, it's almost always due to moisture. Even a few drops of water on the surface of the beans will create a steam pocket in the pan.
| Problem | Root Cause | Solution |
|---|---|---|
| Soggy Beans | Surface moisture or crowding | Dry beans better and use a larger pan. |
| Burnt Garlic | Added too early | Add garlic only in the last 90 seconds of cooking. |
| Tough/Rubbery | Heat was too low | Maintain medium high heat for the initial blister. |
Common Mistakes Checklist
- ✓ Never skip the drying step; use a towel and then let them air dry for 5 minutes.
- ✓ Don't stir the beans immediately; let them sit for 2 minutes to get that first sear.
- ✓ Use a neutral oil; olive oil has too low of a smoke point and will taste burnt.
- ✓ Mince the garlic fresh; the pre minced jars often contain water that splashes in hot oil.
- ✓ Serve them right away; the longer they sit, the more the steam inside softens the crust.
Easy Ingredient Swaps for Special Dietary Needs
If you need to scale this recipe down for a solo dinner, it's very easy. Just use half a pound of beans and one tablespoon of oil. You don't need to cut the garlic in half unless you really want to I usually keep it at 3-4 cloves because we love that flavor.
If you're doubling the recipe for a holiday crowd, I highly recommend working in two separate batches. Adding two pounds of beans to one skillet will drop the temperature too far, and you'll end up with steamed beans instead of fried ones.
For the flavor profile, this is a very flexible dish. While the soy and garlic version is classic, you can easily pivot. If you want a Southern style twist, swap the soy sauce and sesame oil for a splash of apple cider vinegar and some crumbled bacon at the end.
The technique remains the same: blister first, season last.
If you’re looking for a complementary side dish to serve alongside these, my Garlic Fried Rice is a natural partner. It uses similar aromatics, so you can prep the garlic for both dishes at the same time and save yourself a few minutes of chopping.
| Original Ingredient | Substitute | Why It Works |
|---|---|---|
| Soy Sauce | Tamari (1 tbsp) | gluten-free and offers a slightly richer, saltier flavor. |
| Neutral Oil | Refined Coconut Oil | High smoke point but adds a very subtle nutty aroma. |
| Sugar | Honey (0.5 tsp) | Provides the same gloss but with a floral sweetness. |
Chef's Tip: If you want an extra crunch, toss in a handful of crushed peanuts or toasted almond slivers during the last 30 seconds of cooking. The fat from the nuts pairs beautifully with the salty soy glaze.
How to Store and Reheat Your Leftovers
Storage: These beans will keep in the fridge for up to 3 days in an airtight container. Keep in mind that they will lose their "snap" as they sit in the sauce, becoming more like a marinated bean salad. They are still delicious, but the texture will be softer.
Freezing: I generally don't recommend freezing these after they’ve been fried. The cell structure of the bean breaks down when frozen, and when you thaw them, they turn quite mushy. It’s better to eat them fresh!
Reheating: To get some of that texture back, don't use the microwave. Instead, throw them back into a hot, dry skillet for 2-3 minutes. This will evaporate any accumulated moisture and help the glaze re stick to the beans.
Zero Waste Tip: If you have just a small handful of beans left over, chop them up and throw them into an omelet or a quick morning scramble. The garlic and soy flavor carries over beautifully into eggs. You can also toss them into a cold noodle salad for lunch the next day.
Main Courses That Go With These Beans
These beans are a "powerhouse" side dish because they go with almost any protein. They are particularly good with grilled salmon or a simple pan seared chicken breast. Since the beans have a lot of personality, you don't need a complex main dish to make the meal feel complete.
One of my favorite myths to debunk is that you have to blanch green beans before frying them. People think this "locks in the color," but in reality, it just adds unnecessary moisture. When you dry fry from raw, the beans stay a vibrant, deep green because the chlorophyll isn't being leached out into boiling water.
Another myth is that you need a wok to get "wok hei" (that smoky breath of the wok). While a wok is great, a well seasoned cast iron skillet can reach the same temperatures and provide that identical charred flavor.
Finally,, don't worry about the red pepper flakes making this "spicy." At half a teaspoon for the whole recipe, it provides a background warmth rather than a sharp heat. It balances the sugar and the salt perfectly.
If you have kids who are very sensitive to spice, you can leave them out, but I've found that even picky eaters usually don't mind the tiny bit of warmth they provide.
If you want X, do Y
- If you want more crunch: Add the beans to the pan and don't touch them for a full 3 minutes before the first toss.
- If you want it heartier: Sauté 2 ounces of ground pork or turkey in the pan before adding the beans.
- If you want it lighter: Reduce the oil to 1 tablespoon and use a non stick skillet (though the blisters will be less dramatic).

Recipe FAQs
Are green beans okay for diabetics?
Yes, they are an excellent choice. Green beans are a low-glycemic, non-starchy vegetable that provides fiber without spiking blood sugar levels.
Can you just fry green beans?
Yes, but technique is critical. You must wash and pat them completely dry to ensure they blister rather than steam, which is the same logic used to achieve a perfect crust in our Air Fryer Zucchini Fries.
Why are Texas Roadhouse green beans so good?
They rely on high heat searing and savory glazes. The secret is letting them sit undisturbed for 2 3 minutes to develop deep mahogany blisters before adding the aromatics and soy-sugar glaze.
Are green beans good for magnesium?
Yes, they are a solid source. Adding green beans to your rotation is a simple way to boost magnesium intake alongside other essential vitamins.
How to prevent the garlic from burning?
Push the beans to the sides of your skillet before adding garlic. Sauté the minced garlic in the center for only 60 seconds until fragrant, then immediately toss to combine with the rest of the ingredients.
How to tell if the beans are cooked through?
Look for a tender crisp texture. After the initial 2 3 minute sear, fry them for another 3 4 minutes until they are softened but still retain a slight snap when bitten.
Is it true you can use olive oil for frying?
No, this is a common misconception. Olive oil has a low smoke point and will burn during the high heat searing process; always stick to a neutral oil like grapeseed or avocado oil.
Crispy Blistered Green Beans
Ingredients:
Instructions:
Nutrition Facts:
| Calories | 124 calories |
|---|---|
| Protein | 2.4 g |
| Fat | 8.4 g |
| Carbs | 9.6 g |
| Fiber | 3.1 g |
| Sugar | 1.7 g |
| Sodium | 497 mg |
