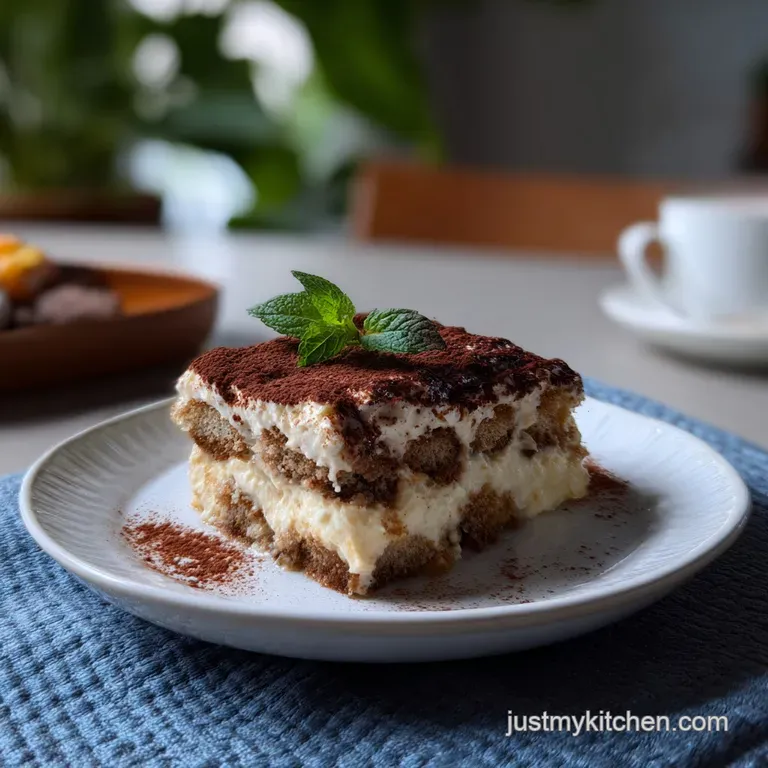
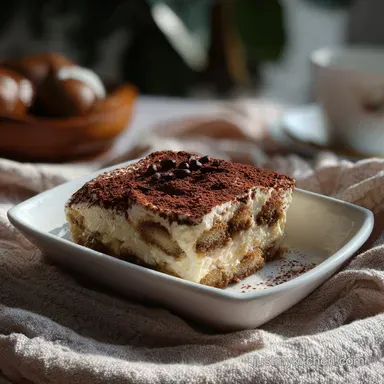
Classic Italian Tiramisu No Egg
- Time: Active 20 minutes, Passive 6 hours, Total 6 hours 20 mins
- Flavor/Texture Hook: Velvety mascarpone clouds paired with coffee soaked, melt away biscuits
- Perfect for: Elegant dinner parties, weekend meal prep, or beginner friendly entertaining
- The Science of Why it Works
- The Vital Statistics for Your No Egg Dessert Masterpiece
- Sourcing the Finest Elements for a Cloud Like Texture
- The Essential Tools Required for Whipping Up Pure Magic
- Step by Step Orchestration of the Ultimate Coffee Soaked Dessert
- Ensuring Structural Integrity and Preventing a Soggy Bottom Mess
- Creative Variations to Make Your Sweet Creation Truly Unique
- Smart Storage Strategies for Maintaining Peak Flavor and Texture
- Elegant Presentation Ideas for a Truly Enchanting Table Experience
- Searing Meat Does Not Seal In Juices
- Mascarpone Should Not Be Beaten For Too Long
- Recipe FAQs
- 📝 Recipe Card
Close your eyes and imagine the sharp, wake up call of a freshly pulled espresso shot swirling into a splash of dark, oaky rum. Now, imagine that intensity being wrapped in a blanket of snowy, whipped mascarpone that feels like silk on the tongue.
That is the experience of this Classic Italian Tiramisu (No Egg Method), a recipe I turned to after a particularly disastrous dinner party where my custard curdled into something resembling sweet scrambled eggs.
We have all been there, and frankly, life is too short for temperamental zabaglione when you can achieve this level of decadence without a single shell.
What makes this specific version so special is how the flavors build. It is not just about sweetness. It is about the contrast between the bitter coffee, the floral vanilla bean paste, and the earthy, unsweetened cocoa powder.
I used to think the egg yolks were the soul of the dish, but after much trial and error, I realized that the real secret lies in the fat content of your cream and the timing of your dip. It is a lighter, cleaner bite that lets the espresso truly shine through.
We are going to walk through this together, focusing on how to prevent that dreaded "soup" at the bottom of the dish and how to get those clean, professional looking layers. Trust me, once you see how stable and sturdy this no egg version is, you will never go back to the stove top whisking marathon again.
It is approachable, it is foolproof, and it is frankly a little bit of kitchen magic.
The Science of Why it Works
Emulsification Stability: Whipped heavy cream creates a structural matrix of air bubbles stabilized by fat globules, while the softened mascarpone provides the density required to hold shape without egg proteins.
Capillary Action: The dry, porous starch structure of the Savoiardi ladyfingers acts like a sponge, drawing in liquid through tiny channels so quickly that a mere one second dip is all that is required for a complete soak.
The Fast vs Classic Comparison
| Feature | No Egg Method (This Recipe) | Traditional Egg Method | Resulting Texture |
|---|---|---|---|
| Prep Time | 20 minutes | 45 minutes | No egg is much faster for busy hosts |
| Stability | High (Cream based) | Moderate (Custard based) | No egg holds its shape longer for clean slices |
| Flavor Profile | Clean, dairy forward | Rich, custard like | No egg highlights the espresso and rum more |
Choosing the right method depends on your comfort level with raw eggs and how much time you have. This Italian Tiramisu (No Egg Method) offers a reliable, sturdy alternative that doesn't compromise on that signature mouthfeel we all crave.
It is a brilliant way to ensure your dessert stays tall and proud even after a few hours on the table.
The Vital Statistics for Your No Egg Dessert Masterpiece
When we talk about building a Tiramisu, we are really talking about building a skyscraper. Each layer needs to be strong enough to support the one above it. This recipe yields 9 generous servings, making it ideal for a standard 8x8 or 9x9 inch square baking dish.
The total time might look long, but almost all of that is "sleep time" in the fridge, which is when the real chemistry happens.
| Component | Quantity | Science Role | Pro Secret |
|---|---|---|---|
| Mascarpone | 1 lb | Structural Base | Keep it slightly cool to prevent the fat from separating during mixing |
| Heavy Cream | 2 cups | Aeration Agent | Use a min 36% fat content to ensure the peaks stay stiff and don't weep |
| Ladyfingers | 7 oz | Starch Skeleton | Use "Savoiardi" (hard) style only, as soft sponge fingers will turn to mush |
Chef's Tip: Freeze your metal mixing bowl and whisk attachment for 10 minutes before starting the cream. This ensures the fat in the heavy cream stays cold and stable, resulting in much tighter, more voluminous peaks that won't deflate.
The resting period is non negotiable here. While you might be tempted to dive in after an hour, the ladyfingers need that time to fully soften and the flavors of the rum and coffee need to migrate into the cream. Think of it as a slow motion flavor infusion.
Sourcing the Finest Elements for a Cloud Like Texture
The beauty of a recipe with so few ingredients is that each one has to be top tier. There is nowhere for mediocre ingredients to hide. I once tried using a cheap, pre ground coffee, and the result was a flat, dusty tasting mess. Now, I only use the good stuff.
- 1.5 cups strong espresso: Use a high-quality roast. If you don't have an espresso machine, a very strong cold brew concentrate or Moka pot coffee works. Why this? Provides the essential bitter backbone to balance the rich dairy.
- 2 tbsp granulated sugar: Just enough to take the edge off the coffee. Why this? Softens the espresso without making it syrupy.
- 3 tbsp dark rum: Look for something aged and aromatic. Why this? Adds a complex, caramel like warmth that lingers on the palate.
- 1 lb mascarpone cheese: It must be the full fat Italian style. Why this? This is the primary thickener and flavor carrier for the cream layer.
- 2 cups heavy whipping cream: Must be at least 36% fat and very chilled. Why this? Provides the lift and lightness that mimics whipped egg whites.
- 0.5 cup powdered sugar: Sifted to ensure no lumps. Why this? Dissolves instantly into the cream for a smooth, velvety finish.
- 2 tsp vanilla bean paste: The little black specks look beautiful. Why this? Offers a much deeper, more floral aroma than standard extract.
- 7 oz ladyfingers (Savoiardi): These should be the hard, sugar dusted variety. Why this? They provide the necessary "snap" and structure for the cake like layers.
- 0.25 cup unsweetened cocoa powder: For dusting between layers. Why this? Adds a matte, earthy contrast to the shiny, sweet cream.
- 1 oz dark chocolate: High cocoa percentage (70% or more). Why this? Provides a sharp, snappy texture when grated on top.
| Original Ingredient | Substitute | Why It Works |
|---|---|---|
| Dark Rum | Brandy or Cognac | Similar deep, woodsy notes. Note: Brandy is slightly sweeter and fruitier |
| Vanilla Bean Paste | Pure Vanilla Extract | Same flavor profile. Note: You will lose the visual appeal of the vanilla specks |
| Ladyfingers | Sponge Cake Strips | Similar texture. Note: Sponge cake is much more absorbent; do not dip, just brush with coffee |
If you are looking for a non alcoholic version, you can swap the rum for a teaspoon of almond extract or simply use more espresso. However, the alcohol does help thin the coffee slightly, allowing it to penetrate the biscuits more evenly.
The Essential Tools Required for Whipping Up Pure Magic
You don't need a professional pastry kitchen for this Tiramisu (No Egg Method), but a few specific tools will make your life much easier. I have tried making this with a hand whisk, and while it's a great workout, it's very hard to get the mascarpone and cream to the right consistency without over mixing.
A stand mixer (like a KitchenAid) is my preferred tool because it keeps a steady pace. You also need a wide, shallow bowl for the espresso soak. If the bowl is too deep, you'll end up submerging the ladyfingers too far, leading to that dreaded sogginess.
A fine mesh sieve is also vital for that final, uniform dusting of cocoa powder.
For a Stable, Non Weeping Cream
To ensure your cream doesn't turn into a puddle after 24 hours, use a chilled stainless steel bowl. Plastic bowls can retain oily residues that prevent cream from reaching its full volume. If you see the cream starting to look grainy, stop immediately.
For the Perfect "Snap to Sponge" Ratio
The tray you choose matters. An 8x8 inch glass dish is great because you can see the layers from the side. Ensure it is at least 2 inches deep to accommodate two full layers of biscuits and cream.
To Maximize Aromatic Depth
Grate your chocolate fresh. Those pre packaged chocolate shavings often have anti caking agents that can feel waxy. A microplane is the best tool for this, creating thin ribbons of chocolate that melt the second they hit your tongue.
step-by-step Orchestration of the Ultimate Coffee Soaked Dessert
Ready to assemble? This is the fun part. We are basically building a savory sweet lasagna. Keep your station organized: one area for the coffee dip, one for the cream, and the central dish for assembly.
- Prep the infusion. Combine 1.5 cups room temperature espresso, 2 tbsp granulated sugar, and 3 tbsp dark rum in a shallow dish. Note: Room temp coffee prevents the biscuits from dissolving instantly.
- Soften the base. In a large bowl, gently fold 1 lb mascarpone with a spatula just until it loses its block shape. until it looks smooth but not runny.
- Whip the cream. In a separate chilled bowl, beat 2 cups heavy whipping cream, 0.5 cup sifted powdered sugar, and 2 tsp vanilla bean paste. until stiff, defiant peaks form.
- Fold carefully. Gradually fold the whipped cream into the mascarpone in three batches. Note: This preserves the air you just worked so hard to incorporate.
- Dip the ladyfingers. Quickly submerge each of the 7 oz ladyfingers into the espresso mixture for 1 second per side. until the exterior is wet but the core is still firm.
- Layer the bottom. Arrange the dipped biscuits in a single layer in the bottom of an 8x8 inch dish. until the entire surface is covered.
- Spread the cream. Top with half of the mascarpone mixture, smoothing it with an offset spatula. until the biscuits are completely hidden.
- Dust with cocoa. Use a sieve to sprinkle half of the 0.25 cup cocoa powder over the cream. until a thin, matte brown layer appears.
- Repeat layers. Add a second layer of dipped ladyfingers, then the remaining cream. until you reach the top of the dish.
- Final flourish. Dust with the remaining cocoa and grate 1 oz dark chocolate over the top. until it looks like a textured, snowy landscape.
The Precision Dip & Layer
One mistake I once made was soaking the biscuits until they were heavy. Don't do that. The ladyfingers should still feel slightly rigid when you place them in the dish. They will continue to soften as they absorb moisture from the mascarpone cream over the next six hours.
This is the "carryover hydration" that ensures a perfect texture.
The Double Dust Finish
I like to dust once before chilling and then give it a very light "refresh" dust right before serving. Cocoa powder absorbs moisture from the cream and can turn dark and wet looking in the fridge. A second light dusting ensures that beautiful, velvety appearance when the dish hits the table.
Ensuring Structural Integrity and Preventing a Soggy Bottom Mess

Tiramisu is notoriously prone to falling apart, especially without the structural support of egg yolks. However, the fat in the mascarpone and the air in the whipped cream are your best friends here.
If your dessert is weeping liquid, it's usually because the coffee was too hot or the biscuits were left in the liquid for more than two seconds.
Why Your Cream Separated
If your mascarpone mixture looks curdled or grainy, you likely over whipped it or the mascarpone was too warm. Mascarpone is extremely high in fat (often 70-75%), and it can turn into butter very quickly if agitated too much.
| Problem | Root Cause | Solution |
|---|---|---|
| Liquid at bottom | Over soaked ladyfingers | Dip for max 1 second; use room temp coffee |
| Grainy cream | Over mixed mascarpone | Fold by hand in the final stages; keep dairy cold |
| Flat layers | Under whipped cream | Ensure peaks are stiff before folding into mascarpone |
Why Your Biscuits Are Crunchy
On the flip side, if the ladyfingers are still hard after 6 hours, the espresso might have been too cold, or the cream was too dry. Make sure your mascarpone mixture is moist and velvety.
If you find yourself in this situation, let the Tiramisu sit at room temperature for 30 minutes before serving to help the moisture migrate.
Common Mistakes Checklist: ✓ Use only room temperature espresso (hot coffee melts the biscuit surface too fast). ✓ Sift your powdered sugar (lumps will never disappear once they hit the cold fat).
✓ Stop whipping the cream the moment it holds its shape (over whipping leads to graininess). ✓ Avoid "soft" ladyfingers from the bread aisle; they cannot handle the liquid. ✓ Always let the dish rest for at least 6 hours (this is the most important step).
Creative Variations to Make Your Sweet Creation Truly Unique
Once you have mastered the Classic Italian Tiramisu (No Egg Method), you can start playing with the flavor profiles. The "No Egg Method" is actually more versatile than the traditional version because the base cream is more stable and less prone to breaking when you add acidic or watery ingredients.
Citrus Flavor Twist
Try swapping the rum for Limoncello and adding a tablespoon of lemon zest to the mascarpone. Instead of espresso, use a light lemon sugar syrup. This creates a bright, summery version that is absolutely refreshing. It’s a complete departure from the coffee version but uses the exact same structural principles.
Nutty Flavor Variation
Add 2 tablespoons of smooth pistachio paste or almond butter to the mascarpone before folding in the cream. You can also swap the dark rum for Amaretto. Top the whole thing with crushed toasted hazelnuts or slivered almonds for a delightful crunch that contrasts with the silky cream.
1. The Decision Shortcut
- If you want a cleaner coffee flavor, use a light roast espresso and skip the cocoa powder between layers.
- If you want a richer, dessert heavy feel, double the amount of grated dark chocolate and use a heavy hand with the rum.
- If you want a kid friendly version, replace the espresso with a strong, caffeine free chicory coffee or even a rich chocolate milk.
| Serving Size | Pan Size | Ingredient Adjustment | Chill Time |
|---|---|---|---|
| 4 People | 6x6 inch | Use 1/2 of all ingredients | 4 hours |
| 9 People | 8x8 inch | Follow recipe exactly | 6-8 hours |
| 18 People | 9x13 inch | Double all ingredients | 12 hours |
Smart Storage Strategies for Maintaining Peak Flavor and Texture
This is one of the few desserts that actually gets better with age, up to a point. During the first 24 hours, the flavors are busy shaking hands and getting to know each other. The coffee seeps into the cream, the rum mellows, and the cocoa powder settles into a rich coating.
Storage: Store your Tiramisu (No Egg Method) in the refrigerator, tightly covered with plastic wrap. It will stay fresh and delicious for 3 to 4 days. If you find the top looks a bit "sweaty" after a couple of days, just give it a fresh dusting of cocoa before serving.
Freezing: Surprisingly, you can freeze this! Wrap the entire dish (without the final cocoa dusting) in a double layer of plastic wrap and then foil. It will last for up to 2 months. To serve, thaw it in the fridge for 24 hours.
The texture will be slightly denser, almost like a semifreddo, which is honestly quite delightful.
Zero Waste: If you have leftover espresso, don't pour it down the drain. Freeze it in ice cube trays for iced lattes later in the week. Any leftover ladyfingers can be crushed and used as a base for a cheesecake or sprinkled over yogurt.
Even the cocoa powder scraps can be mixed with a little sugar and salt to make a quick hot chocolate mix.
Elegant Presentation Ideas for a Truly Enchanting Table Experience
Serving this Tiramisu (No Egg Method) can be as casual or as fancy as you like. For a family dinner, I just bring the 8x8 dish to the table and let everyone dig in. But for a special occasion, you can really make it shine.
One trick I love is making individual portions in glass ramekins or even wine glasses. This way, you get to see all the beautiful layers without worrying about the "first slice" mess that usually happens with a large dish.
It looks incredibly professional and makes each guest feel like they’ve been served something made just for them.
Better Than Dining Out
To get those crisp, clean edges you see in high end Italian restaurants, use a hot knife to slice the chilled Tiramisu. Dip the knife in hot water and wipe it dry between every single cut. This prevents the cream from dragging and keeps the layers distinct.
For Restaurant Quality Presentation
Finish the plate with a few coffee beans or a sprig of fresh mint. If you’re feeling extra, you can serve it with a small glass of the same rum you used in the recipe. The scent of the rum in the glass will heighten the flavors in the dessert, creating a truly immersive experience.
Searing Meat Does Not Seal In Juices
Many people believe that the "dip" in Tiramisu needs to happen while the coffee is scalding hot to "activate" the ladyfingers. This is a myth. Hot liquid actually breaks down the exterior starch too quickly, resulting in a soggy outer layer and a dry interior.
Room temperature liquid allows for a more even, controlled absorption.
Mascarpone Should Not Be Beaten For Too Long
Another common misconception is that you need to beat the mascarpone until it’s fluffy. In reality, mascarpone is closer to butter than it is to cream cheese. If you overwork it, the fat molecules will clump together, giving you a grainy, oily texture.
Always treat it gently, and fold it by hand if you’re unsure.
By following these techniques and respecting the science of the ingredients, you are going to create a Tiramisu (No Egg Method) that is remarkably better than anything you can buy at the store.
It is about the love of the process, the smell of the coffee, and that first, velvety bite that makes all the waiting worthwhile. Happy whisking!

Recipe FAQs
Can I use store-bought mascarpone?
Yes, if it's full fat Italian style. Mascarpone is the primary thickener and flavor carrier, so avoid low-fat or imitation versions for the best texture.
How long should I dip ladyfingers in espresso?
Quickly dip for 1 second per side. The exterior should be wet, but the core should remain firm to prevent sogginess.
Is it true that room temperature espresso is better for dipping?
Yes, room temperature is crucial. Hot liquid breaks down the ladyfingers too quickly, leading to a soggy exterior and dry interior.
What if my mascarpone mixture looks grainy?
You likely over whipped it. Mascarpone is high in fat and can turn oily or grainy if agitated too much; treat it gently and fold by hand if unsure.
Can I make this tiramisu without rum?
Yes, easily. Substitute the rum with almond extract or simply use more espresso for a non-alcoholic version; the alcohol adds complexity but isn't essential.
How long does tiramisu need to chill before serving?
A minimum of 6 hours is essential. This allows the ladyfingers to soften and the flavors to fully meld and infuse throughout the dessert.
Why is my tiramisu weeping liquid at the bottom?
Likely over soaked ladyfingers or too hot coffee. Ensure a quick dip and room temperature espresso; the cream should absorb moisture, not release it.
Classic Tiramisu No Egg
Ingredients:
Instructions:
Nutrition Facts:
| Calories | 565 kcal |
|---|---|
| Protein | 5.7 g |
| Fat | 43.9 g |
| Carbs | 35.7 g |
| Fiber | 1.4 g |
| Sugar | 19.8 g |
| Sodium | 33 mg |
